After 15 years of renting apartments in Brooklyn and living with other people’s design decisions, it was a dream come true when my husband and I bought a 1,000-square-foot home in Maplewood, New Jersey—a suburb thirty miles outside of New York City.
Our home, we jokingly say, is the smallest house in Maplewood—it might be close! It is a three-bedroom, one-bathroom colonial with a tiny yard. That said, there was something very attractive about the small space: after all, we were used to making the most of little apartments, and this time, we’d actually be able to remodel it to make it our own.
The kitchen had been renovated within the past ten years by the previous homeowners. It was a DIY job with everything bought off the shelf at Home Depot. It had character, but the space was so dark and cluttered it made my chest tight just looking at it. The black-tiled countertops were failing apart and impossible to clean. All the electrical in the kitchen had been done by the previous homeowner, so half the lights didn’t work and there was a bizarre collection of outlets and breakers throughout the kitchen that felt very unsafe. And the misaligned cabinets made me crazy!
Needless to say, we were eager to make the kitchen the first major renovation of the property. We originally were planning to do it over the summer of 2020, but with the worldwide outbreak of Covid-19, we got nervous about how the economy was going to be affected, so we postponed the renovation until February 2021. In hindsight, enduring a renovation while living in the home during a very cold and snowy winter wasn’t ideal. If we had to do it all over again, we would have scheduled the project for summer.
Other than that, we don’t regret a thing. The entire project was completed in two months and totaled $36,000 (a not-small figure but, from what I hear, less than what most kitchen renovations cost around here). Below, I share my hard-won lessons on how to stay on budget and still get the results you’re after:
Photography by Amanda de Beaufort.
[N.B.: Amanda’s side gig is designing and naturally dying textiles for her label A_DB Botanical Color. Read our story about it here.]
1. Hire an expert.

The idea of remodeling the kitchen made my head want to explode—my husband and I are not handy people. There were so many decisions and parts that I didn’t know where to start and how to proceed. Hire an architect? Hire a contractor? Use a kitchen planner at a cabinet store? DIY it?
The team you put together for your remodel is perhaps the most important step. I work in the architecture field and have a pretty good sense of design and space planning, but a kitchen has so many details that I felt I needed to have an expert to help me through the process. I am so glad we ended up elisting an architect, as I later realized this was one of the most important decisions.

The major things we wanted to change space-wise was to remove the L-shape that created a pinch-point near the dishwasher and sink; move the fridge to the back pantry area, since the kitchen is so small I didn’t want a big dead space in the middle of it; and take down the partial wall that separated the kitchen and dining room. (Scroll down if you want to see the before shots.) The last part was a huge question mark since we wouldn’t know until they opened up the walls if there were structural supports that we would need to keep. Side note: once you start changing structure your budget balloons.

We used Kevin Teague Design in New York City. Kevin has a lot of experience making the most of small kitchen spaces and I have known him for 20 years, so it helped to have someone I knew and trusted to hold my hand along the way. He worked with us to create a set of drawings. These drawings were very important because they served as a roadmap along the way. Inevitably, issues came up and the reality of a 100-year-old house with no straight lines became clear, but it was so useful to reference the drawings any time a sub-contractor showed up and had a question.
2. Shop and compare.

Once we had the layout, my husband and I choose all the finishes and materials. We didn’t want the kitchen to be a neutral space—our goal was to incorporate color and have an overall design that was our style. Our inspiration was a child’s play kitchen. We wanted blocks of color, bold graphic elements, and everyday materials, but also a sense of playfulness and joy.
Obviously cabinets are huge part of the kitchen aesthetic and a big chunk of the budget. We were going for a modernist look, so our options were very limited: Shaker style fronts from a cabinet maker or the Ikea route and/or buying fronts from Semi-handmade or Reform.

I met with an IKEA kitchen planner and enjoyed the experience and the price was very reasonable. I know these kitchens are great and even our architect recommended this option, but for us, it made us too nervous. Most contractors (ours included) will not put together IKEA cabinets for you, so you will need to use their installers. And at the end of the day, I wouldn’t buy an IKEA dresser, so why would it be good enough for our kitchen?
We were ready to go with Shaker cabinets, when my enlightened contractor suggested he could make slab front cabinets in any color we wanted—custom! The price was about the same as buying premade cabinets. This was a major game changer! Remember what I said about having a good team? Once our contractor understood the look we wanted everything else fell into place.
3. Add your personality.

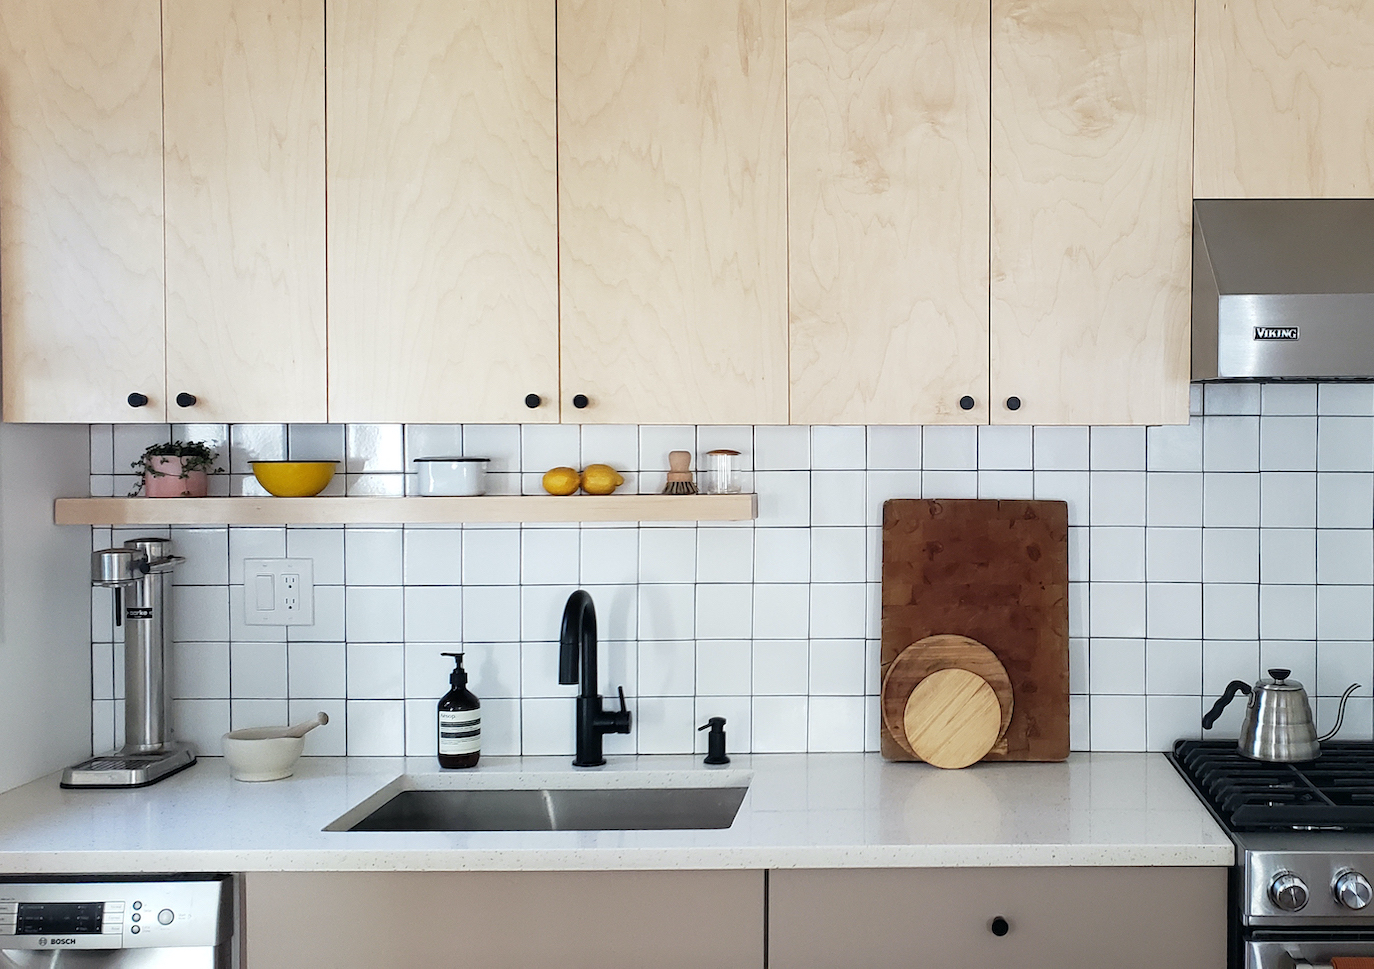
With such a small space, we decided to do most of the design moves with a mix of materials as opposed to lots of colors. The limited palette kept the space feeling more open and airy and we knew we could accessorize with colors. We chose maple plywood for the uppers—because the warmth and versatility of natural wood is modern, clean, and classic.
My husband and I are both big pink fans (we have a pink sofa!) and I adore a pink shade that reads as a neutral, so we chose Farrow and Ball’s Dead Salmon for the lower cabinets. It reads anywhere from pink to purple to mushroom depending on the light.

I spend a fair amount of time in Milan for work, and I am obsessed with real Italian terrazzo. I really wanted to include terrazzo in our kitchen; even though it is having a moment right now, it is such a classic. I love the texture and it is a great way to add color and warmth to a room. We explored a lot of options and at the end of the day it didn’t fit our budget to get the real stuff, and I feared we’d grow tired of a concrete option. Instead, we found a quartz countertop with a terrazzo effect in a warm white and paired it with highly sustainable handmade tile from Fireclay with a contrasting grout to give a bold graphic pop to the design.
4. Brace yourself for surprises.
When you tell people you are renovating, you will hear a lot of horror stories, and you should brace for the unexpected. We had two surprises in our construction project:
The first was the wall we were hoping to take down, at least partially, was not structural at all! It was basically just floating there. So we said “bye-bye” and suddenly had a huge open space to work with. This didn’t change much of the design, since it was something we were crossing our fingers would happen, but now our kitchen and dining area are totally open to each other.

The second surprise was once they ripped out all the old laminate wood flooring, it revealed an original wood floor. As a renovation newbie I never thought in a million years it was salvageable—it was dark black, crusted with dirt, glue, paint, and dark water stains—but it was! This was such a pleasant surprise since we were going to try to match the wood on the first floor.
This discovery was great, but it also meant we had to refinish the hardwood floors on the full first level. This was probably the biggest interruption to our lives since we had to vacate our home for four days and hadn’t planned or budgeted for that during a pandemic.
All in all, though, our surprises were happy ones. Especially when you consider where we started from…
Before


N.B.: For more transformations we love, see:
- Before and After: A Couple’s DIY Cabin Upstate, Redone During Quarantine
- Before & After: A 2,500-Square-Foot Pre-War Brooklyn Apartment Opens Up by Relocating the Kitchen
- Rehab Diary: Architect Ben Daly and Family at Home in a Converted Sheep Shed
Frequently asked questions
What was the main goal of the kitchen renovation?
The main goal of the kitchen renovation was to update the cramped and dated space to a clean, modern look.
Where is the kitchen located?
The kitchen is located in Maplewood, NJ.
What materials were used in the renovation?
The renovation used a mix of materials including white cabinetry, black granite countertops, a subway tile backsplash, and brass hardware.
Who was the designer of the kitchen renovation?
The designer of the kitchen renovation was Julie Torres Moskovitz of Fete Nature Architecture.
What kind of lighting was used in the renovation?
The renovation used a combination of recessed and pendant lighting to create a well-lit and functional space.
What was the biggest challenge in the renovation?
The biggest challenge in the renovation was working with the small space of the kitchen and maximizing storage and functionality.
What was the budget for the renovation?
The budget for the renovation was not disclosed in the article.
Is there a before and after comparison available?
Yes, there are before and after photos available in the article.

Have a Question or Comment About This Post?
Join the conversation