Icon - Arrow LeftAn icon we use to indicate a rightwards action. Icon - Arrow RightAn icon we use to indicate a leftwards action. Icon - External LinkAn icon we use to indicate a button link is external. Icon - MessageThe icon we use to represent an email action. Icon - Down ChevronUsed to indicate a dropdown. Icon - CloseUsed to indicate a close action. Icon - Dropdown ArrowUsed to indicate a dropdown. Icon - Location PinUsed to showcase a location on a map. Icon - Zoom OutUsed to indicate a zoom out action on a map. Icon - Zoom InUsed to indicate a zoom in action on a map. Icon - SearchUsed to indicate a search action. Icon - EmailUsed to indicate an emai action. Icon - FacebookFacebooks brand mark for use in social sharing icons. flipboard Icon - InstagramInstagrams brand mark for use in social sharing icons. Icon - PinterestPinterests brand mark for use in social sharing icons. Icon - TwitterTwitters brand mark for use in social sharing icons. Icon - Check MarkA check mark for checkbox buttons.
You are reading

DIY: Vintage-Looking Mercury Glass Pendant Lights for $25

Search
the home depot logo 300x180 7

DIY: Vintage-Looking Mercury Glass Pendant Lights for $25

April 2, 2018

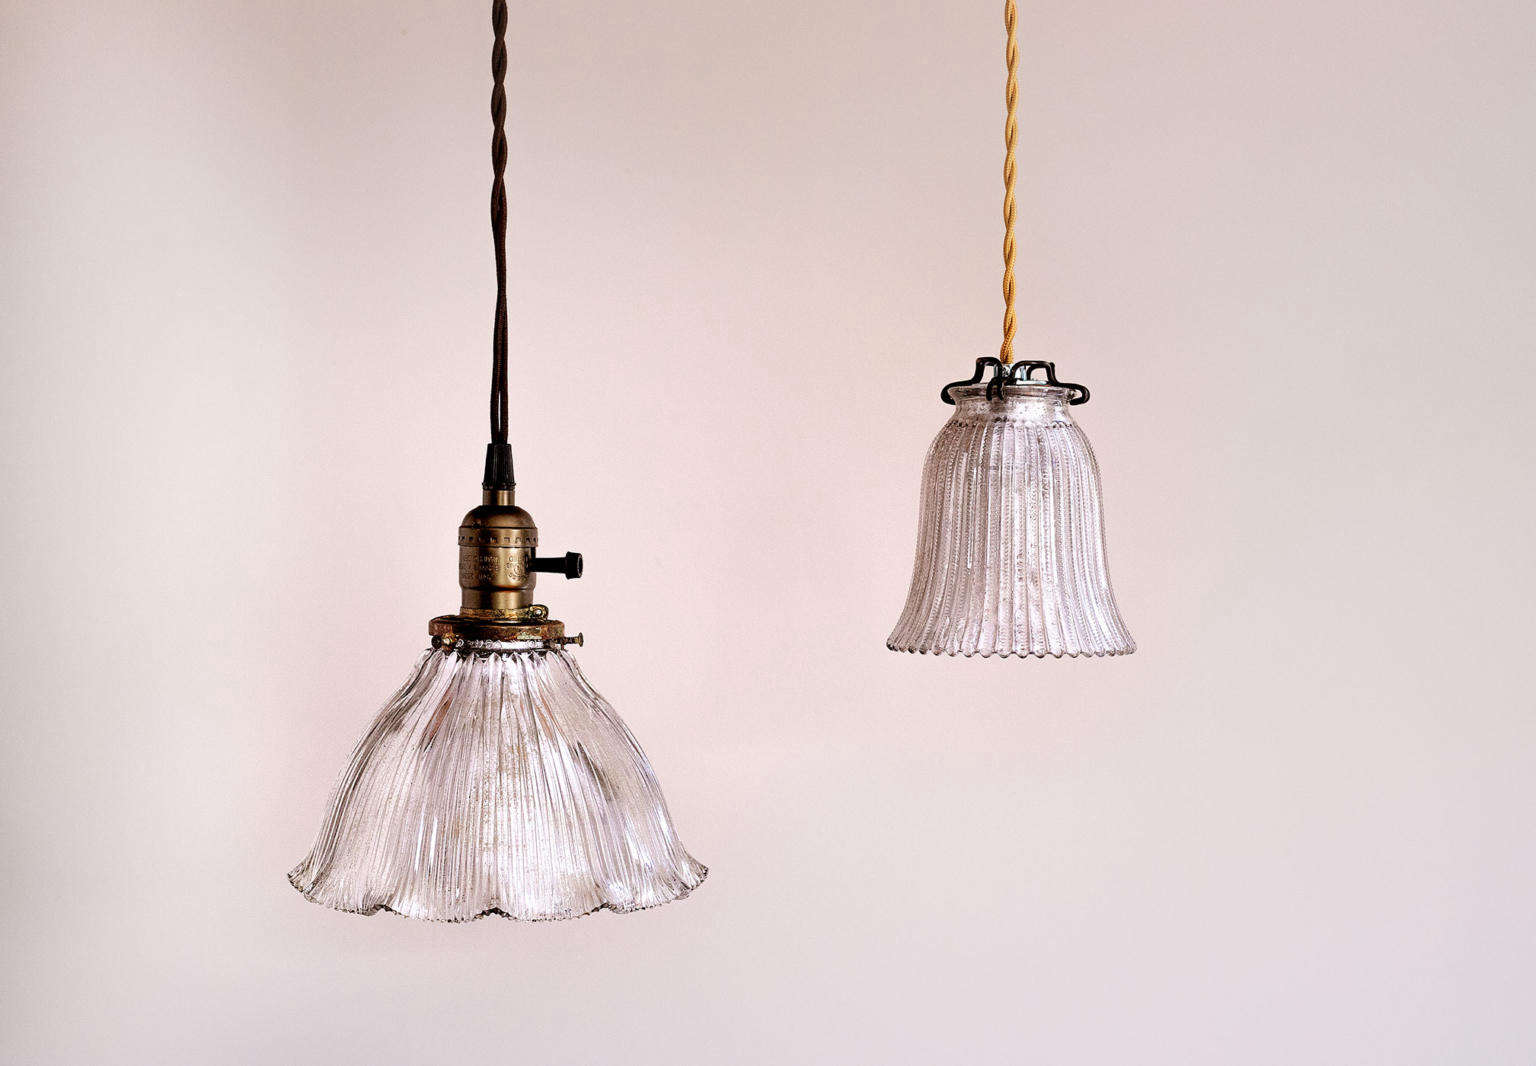
Call it a domestic aha moment. As the owner of two old houses, I’ve inherited many a vintage glass shade. The originals were attached to brass ceiling fixtures that I subsequently replaced with more updated lighting. But I never could bring myself to part with the lovely old shades, which languished in the basement. Finally, a Pinterest tutorial on how to make faux mercury glass votives provided that long-awaited spark of inspiration.

Turns out, making your own vintage-looking mercury glass shade is quick and easy. The results are beautiful, and the price: less than $25 dollars for the spray paint and vintage style cord. Even if you have to buy the glass shade, these go for as little as $6 on eBay or Etsy. I call that a DIY success story.

Here’s how I did it.
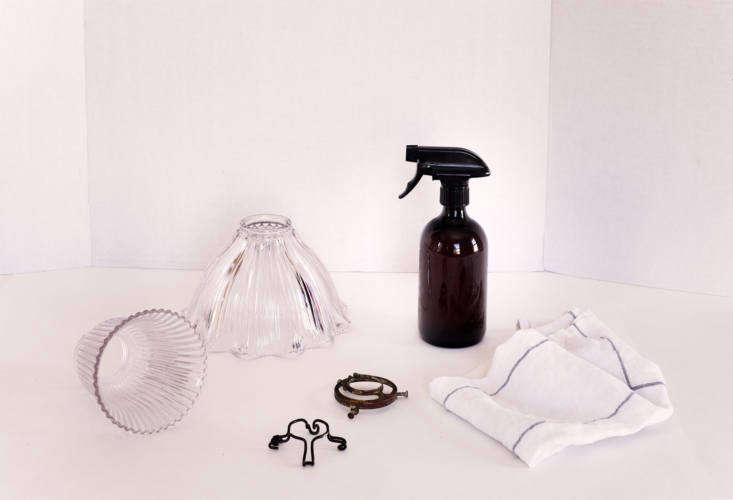
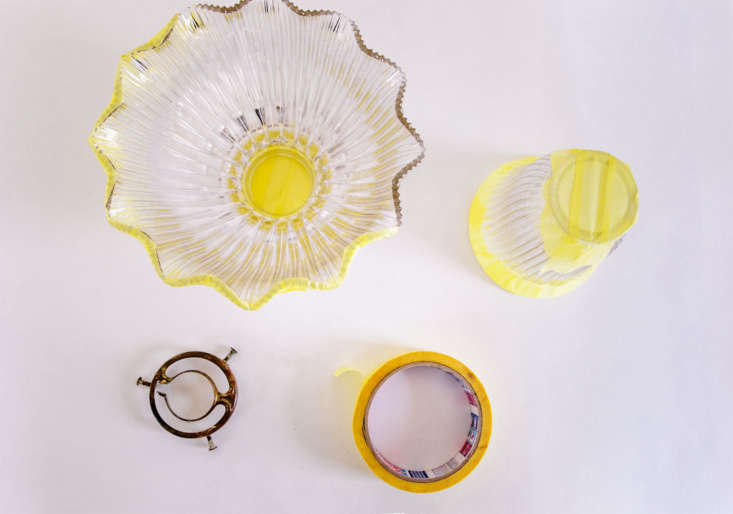
Supplies:

i found vintage shades, similar to those shown here, on ebay for as little as \ 18
Above: I found vintage shades, similar to those shown here, on eBay for as little as $12 for the large and $6 for the small.
  • Vintage glass or replica shade
  • Pendant cord with socket
  • Rust-Oleum Mirror Effect spray paint
  • Spray bottle
  • Vinegar
  • Paper towels
  • Gold metallic spray (optional)
  • Tape
  • Gloves (optional)
  • Rubbing alcohol (optional)

Glass shades are relatively easy to come by and don’t cost much. Etsy and eBay have numerous choices. Home Depot also sells similar replica shades for $6. (Note: Many of these antique shades are missing the hardware used to attach them to the lamp. Happily, this is also easily obtained. Search for “antique lamp shade bracket.” Do make sure you get the right size, though, by measuring across the top of your shade.)

Step 1: Clean the shade.

remove hardware and apply windex or your \1 to \1 water to vinegar mix to clean 19
Above: Remove hardware and apply windex or your 1-to-1 water to vinegar mix to clean your glass shade. Thoroughly dry the shade with a lint-free cloth.

Step 2: Tape the outside and edges of the shade.

for this diy, you paint the inside of your shade. therefore, it&#8\2\17;s i 20
Above: For this DIY, you paint the inside of your shade. Therefore, it’s important to seal off the exterior of the shade by taping the edges. I used FrogTape Delicate Surface Painters Tape; $8 at The Home Depot.

Step 3: Prepare your spot spray.

real vintage mercury glass often has a molted effect where the original silver  21
Above: Real vintage mercury glass often has a molted effect where the original silver coating has tarnished. To create this effect, you need to create a mild paint thinner or solvent by mixing one part water with one part vinegar. (A few tutorials used rubbing alcohol for this purpose, but I found that it removed too much of the paint.)

Step 4: Spray the shade with a vinegar/water solution.

the trickiest part of this diy is the application of the solvent and paint, whi 22
Above: The trickiest part of this DIY is the application of the solvent and paint, which has to be done quickly. Before I started in with my lamps, I practiced apply the layers of vinegar solution and paint on an old piece of glass.

Lightly mist the inside of your shade with the vinegar/water solution. Avoid soaking it, as this will create drips, which is not the effect you want. Depending on the size of your shade, you can either work in sections or spray the whole thing at once. I found the latter method worked well with small-to-medium shades.

Step 5: Apply a light coat of mirror effect spray paint.

again, working quickly, spray a light coat over the inside of the shade. you wi 23
Above: Again, working quickly, spray a light coat over the inside of the shade. You will notice that the paint will bubble where it meets the vinegar spray.

Step 6: Gently dab the painted surface with a paper towel.

if this step seems daunting, don&#8\2\17;t worry, as mistakes are easily fi 24
Above: If this step seems daunting, don’t worry, as mistakes are easily fixed. If you wipe too much of the paint away, simply repeat the process. Excess paint can be removed with a bit of rubbing alcohol.

Allow the paint to dry for a minute or two, but not completely. Gently dab paper towel on the water/vinegar spots to absorb the solution. If you want a more streaked effect, wipe the towel in random spots across the paint.

Step 7: Repeat layered application of vinegar solution and paint.

repeat steps 4 through 6 until you achieve the desired effect. 25
Above: Repeat Steps 4 through 6 until you achieve the desired effect.

Step 8 (Optional): Apply a fine coat of gold metallic spray paint.

once finished, i found the effect of the mirror spray to be a bit cold. a very  26
Above: Once finished, I found the effect of the mirror spray to be a bit cold. A very subtle application of metallic gold spray paint mimics the warm patina of genuine vintage lamps.

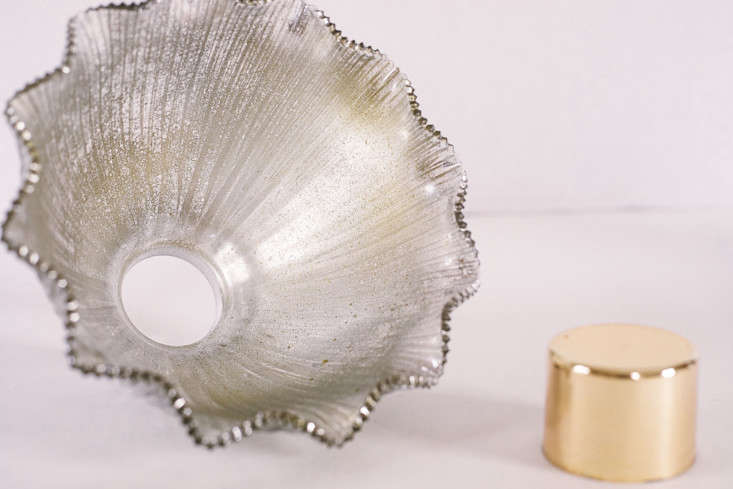
Step 9: Assemble your lamp.

once your shade is completely dry, reassemble the pendant lamp. 27
Above: Once your shade is completely dry, reassemble the pendant lamp.
test your light to make sure it works. 28
Above: Test your light to make sure it works.

Final Look

diy vintage mercury glass pendant light large off 2
Above: Here is my lamp with the larger shade, unlit.
as you can see in my smaller shade lamp, the subtle mottled effect is even more 30
Above: As you can see in my smaller shade lamp, the subtle mottled effect is even more visible when the lamp is lit.
my new/old mercury lamps. 31
Above: My new/old mercury lamps.

For more DIY projects, see our posts:

(Visited 1,158 times, 1 visits today)
You need to login or register to view and manage your bookmarks.

v5.0