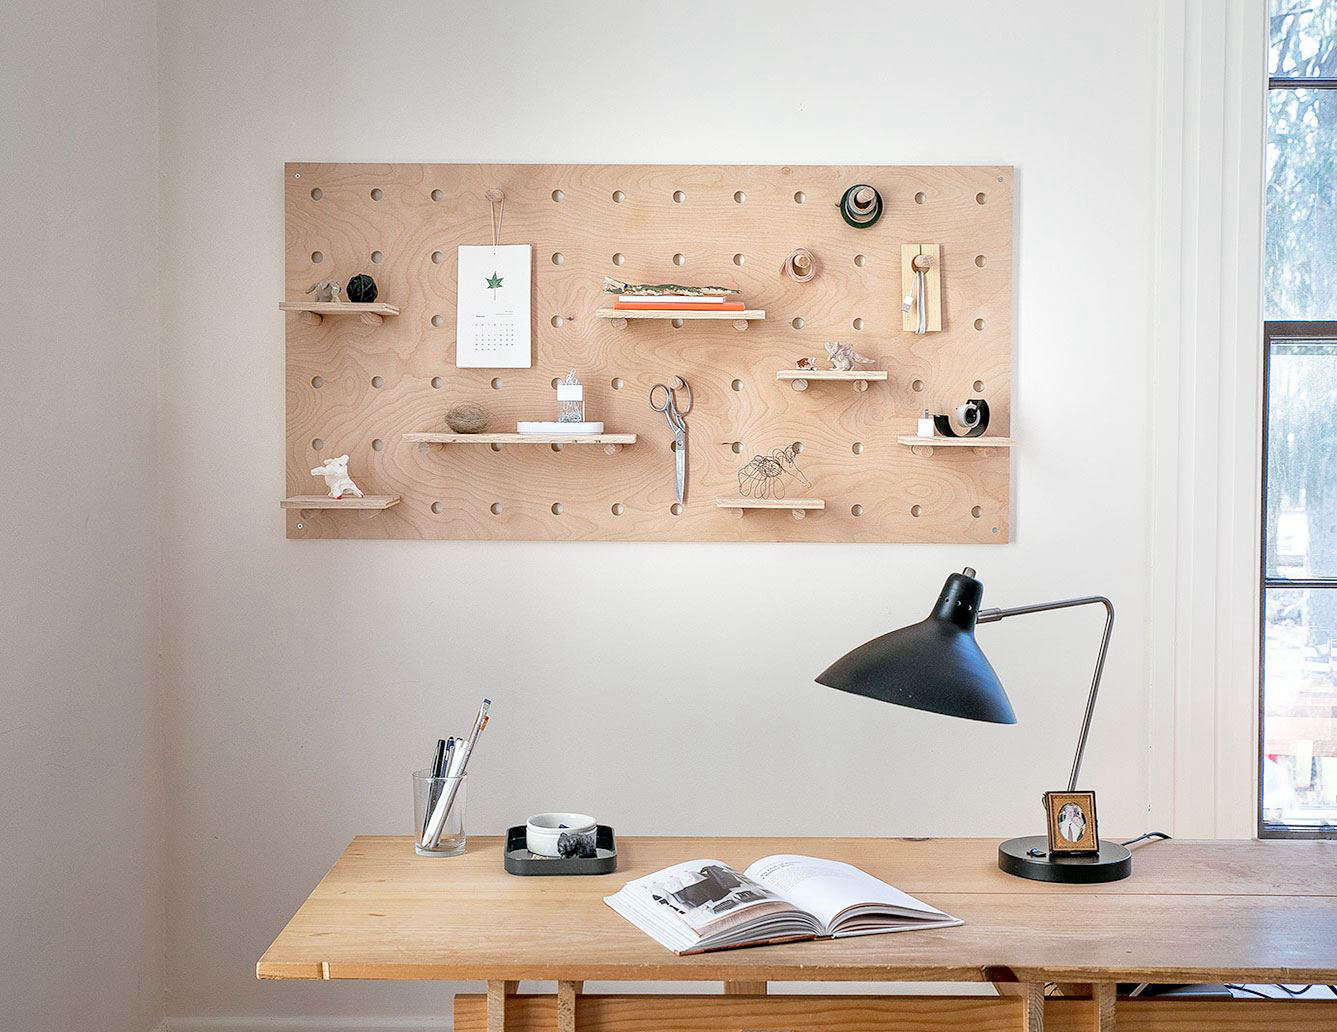
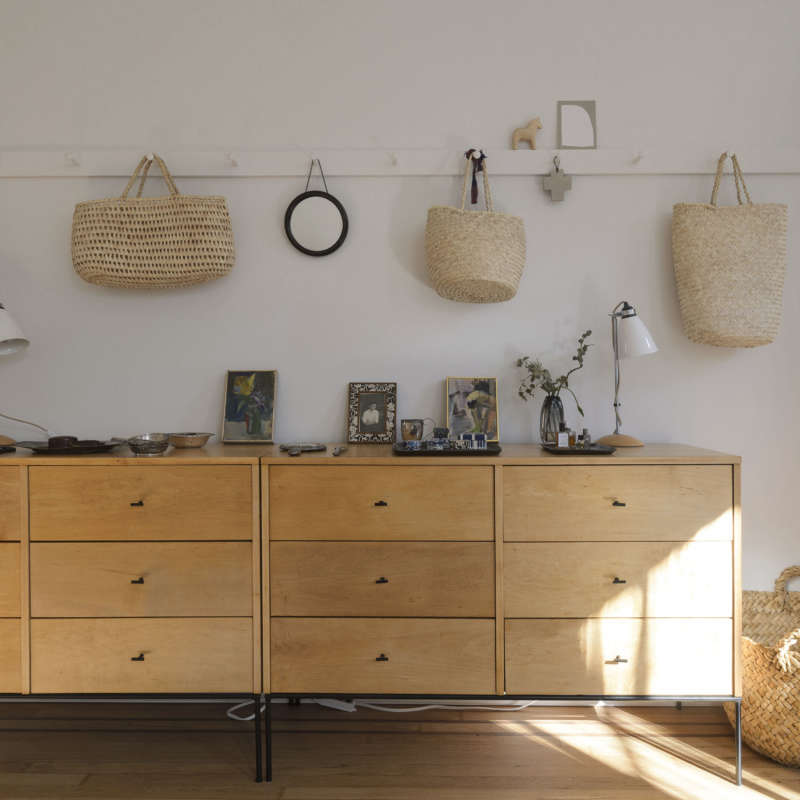
After admiring Julie’s wooden pegboard from Germany (as seen in Remodelista: The Organized Home), I hinted to my husband, Chad, that it would make a lovely Christmas present. He, being a woodworking hobbyist, decided it would be easier to make one himself.
Not quite.
Without directions or guidelines, designing and executing a pegboard so that everything lines up cleanly takes a lot of thought. Fortunately, my husband has done the work for you. Chad now has three such boards under his belt. Total time to make one? About four or five hours. Not easy, but definitely doable in one day.
Here’s Chad’s how-to.
Supplies

Wood and hardware
- ¾-inch thick birch plywood (approximately 24 by 48 inches) for pegboard or base
- ½-inch thick birch plywood (approximately 24 by 48 inches) for shelves
- 4-to-6¾-inch thick oak wood dowels (approximately 36 inches long) for pegs
- 1-inch wood screws for shelves
- Four long (1¾ inch) wood screws to screw the backboard into the wall studs
Tools
- table saw
- chop saw
- drill
- countersink drill bit (No. 6)
- bench vise
- drum sander
- hand sander
- belt sander
For a more manual approach, you could use a circular saw and hand saw, but these tools would make it hard to achieve even edges.
Step 1: Sand base board.
To create a smooth surface, lightly sand the edges of ¾-inch plywood base.
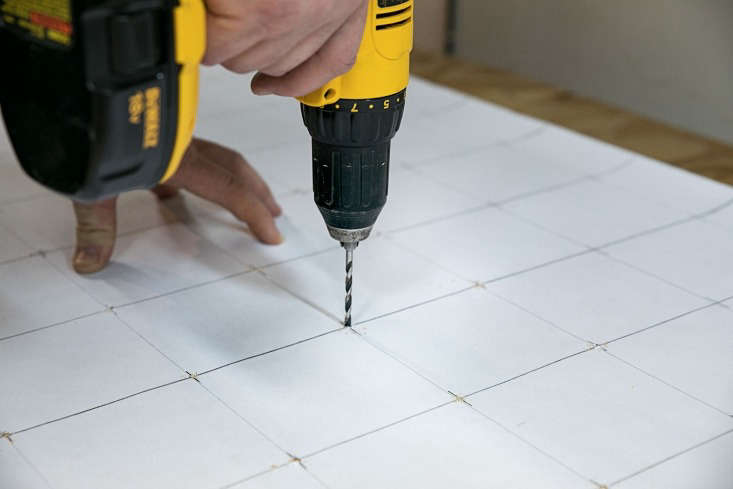
Step 2: Create template.

- Decide how big to make your board, how many holes, and the ideal spacing of the holes. Look around on the Web to see what others have done. Or follow Chad’s template below.
- Especially if you want to make multiple uniform pegboards, it’s helpful to create a template. Tape a sheet of paper, equal in size, to the front of your board (typically, birch plywood has a back side that is less aesthetically pleasing, so be sure to select the cleaner side as the front).
- Measure and mark your spacing.
- Drill through the paper with a small bit, to mark the center where you will drill your larger peg holes.
- Remove paper and save in case you make another board.
Chad’s template using a 24-by-48-inch plywood board:
- Two-inch borders
- Six evenly spaced horizontal holes four inches apart from center to center
- 12 evenly spaced vertical holes four inches apart from center to center

Step 3: Drill holes from both sides.
- To avoid holes in your worktable, place another piece of cheap or scrap plywood under your baseboard.
- Using the smaller holes from the template as your guide, begin drilling the larger holes with an 11/16-inch drill bit. Note: Pegs are typically slightly smaller than ¾ inch so the 11/16 inch bit provides a tighter fit; however, you may need to use the ¾ inch bit instead.
- To avoid splitting the plywood, drill just until the bit begins to poke through. Don’t drill all the way through.
- When all holes are drilled from the front, turn the board over and finish each hole from the back.


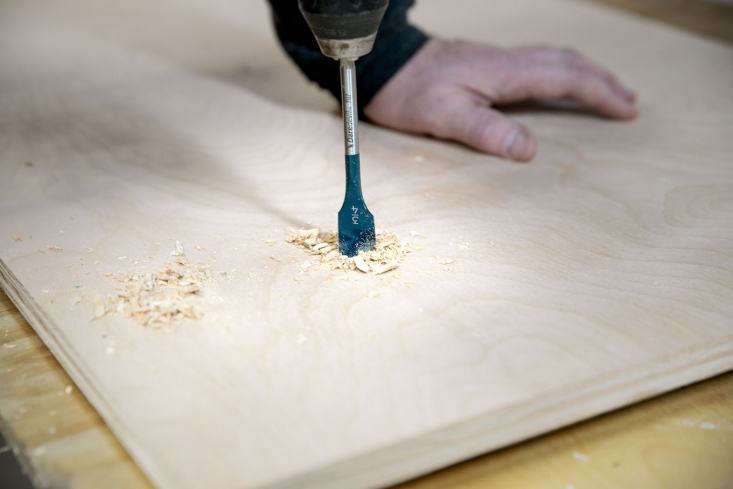
Step 4: Sand holes.

- Use the drum sander to gently clean up the rough edges in the holes.
- Don’t over-sand or your pegs won’t fit tightly.

Step 6: Cut six-inch dowels or pegs.

- Use handsaw and bench vise, or use chop saw to cut dowels into six-inch pegs. Some will be used just as pegs; some will be used for shelves.
- Sand the edges of each peg by hand to avoid splinters.
Step 7: Cut six-inch lengths for shelf boards.

- Use a table saw, or a circular saw if by hand, to cut six-inch strips from the half-inch birch plywood; you will use this wood to make the shelves.
Step 8: Cut shelves into three widths.

Calculating shelf widths is a bit awkward with this project because they will be determined by the number of holes each shelf crosses.
- First decide how many single (straddling two holes), double (between three holes), and triple shelves you need.
- Determine if you want the sides of your shelf boards to overlap the pegs underneath or rest flush with them. Chad and I decided that we wanted a 1½-inch overlap.
- Measure and mark each length of shelf.
- Cut with chop saw.
Step 9: Sand shelves and pegs.

- Hand sand the edges of each shelf and peg to avoid splinters.
Step 10: Drill holes in shelf pegs with countersink bit.

- Based on how many shelves you have, determine the number of pegs that need screw holes. You’ll need two per shelf.
- Secure pegs in a vice.
- Mark the center of the peg with a pencil.
- Using a No. 6 countersink drill bit (so screws will be hidden from view), drill one hole at the center of each shelf peg. Chad recommends one hole for beginner pegboard makers, as a single screw will allow the pegs to pivot a bit in case one’s peg holes are slightly off. For more advanced makers, two holes are more secure. Chad recommends these be drilled 1½ inches and four inches from the front edge of peg.

Step 11: Screw pegs to shelves.

- Once you’ve completed all your drill holes, use a measure to mark peg placement, so that each is ¾ inch from the front of the shelf and one inch from the sides.
- Gently screw in each peg, so as not to split the shelf.
Step 12: With Countersink Bit, Drill Holes in Each Corner for Hanging

You are ready to hang your board!
- Measure and mark one inch from the top and side edges of each of the four corners of the baseboard.
- Using the same countersink drill bit as above, drill a hole in each corner.
- Note: If your walls are drywall or similar material, they may not be able to support the weight of the board. In this case, you should use a stud finder to identify where to hang your board. Make sure to adjust the placement of your holes accordingly.
Step 13: Drill Base to Wall

- Place your board in desired location, and use a level to make sure it’s straight.
- Secure to wall with four two-inch screws.
Step 14: Arrange shelves and pegs.

Now is the fun part. Arrange shelves as desired and organize your items on shelves and pegs.

Looking for more pegboard inspiration? See:
- Kitchen of the Week: An Artful Kitchen Created from Reclaimed Ikea Parts, Extreme Budget Edition
- 12 Favorites: Pegboard Storage Organizers
- News You Can Use: Ikea’s Skådis Pegboards Now Available in US
N.B.: This post first ran on the Organized Home on February 21, 2018.
Frequently asked questions
What is the purpose of the oversized plywood pegboard?
The oversized plywood pegboard serves as a versatile storage solution for organizing and displaying various items like tools, accessories, and decorative objects.
What materials are needed to make the plywood pegboard?
To create the plywood pegboard, you will need a sheet of plywood, a circular saw, a drill, pegboard hooks, a sander, a stain or paint of your choice, and necessary hardware for hanging.
Is it suitable for beginners to attempt this DIY project?
Yes, this DIY project is beginner-friendly. The tutorial provides step-by-step instructions along with illustrative images to guide you through the process.
How large should the plywood sheet be for an oversized pegboard?
The suggested size for the plywood sheet is 4x8 feet, but you can adjust the dimensions based on your preference and available space.
Can I customize the pegboard's design?
Absolutely! The tutorial provides a basic design, but you can customize the size, shape, and arrangement of the holes according to your needs and personal style.
What is the recommended method for finishing the plywood pegboard?
You can choose to either stain the plywood for a natural wood look or paint it in your preferred color. Both methods are effective in protecting the wood and enhancing its appearance.
Where can I find pegboard hooks?
Pegboard hooks are readily available at hardware stores, home improvement centers, or online retailers. They come in various sizes and styles, allowing you to select the ones that best suit your storage requirements.
Is it necessary to hang the pegboard on studs?
While it is recommended to attach the pegboard to studs for added stability and strength, you can also use wall anchors or toggle bolts if studs are not accessible or spaced as desired.
Can this pegboard be used outside in an outdoor setting?
The plywood pegboard is primarily designed for indoor use. However, you can adapt the project for outdoor use by using weather-resistant materials such as marine-grade plywood and suitable paint or sealant.
Are there alternative uses for the oversized plywood pegboard?
Certainly! Apart from storage and organization, the pegboard can be transformed into a creative display board, a decorative wall feature, or even a workspace for hanging tools and supplies.

Have a Question or Comment About This Post?
Join the conversation