We have a fondness for the earthy warmth of terracotta lighting–see 10 Favorites: Terracotta Pendant Lights. But it wasn’t until we spotted Australian garden designer Joost Bakker’s DIY approach that owning a clay pendant seemed too easy to pass up.
Bakker is a master at elevating the terracotta flowerpot: He designs stand-alone iron planters and large vertical gardens full of them. And for his own family home in Monbulk, Australia, just east of Melbourne, Bakker devised dozens of unusual lighting options. Our favorite is the upside-down flowerpot lampshade that hangs in the main bedroom. I’m no electrician, but I sleuthed the parts and easily copied the look. Here’s a step-by-step tutorial.
The Inspiration

Above: Joost Bakker’s weathered terracotta flower pot works well with a wood sideboard and brick wall. Photograph by Sean Fennessy for The Design Files.
Materials

- A terracotta flower pot, about six inches in diameter at its widest point
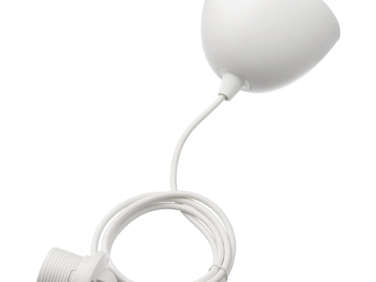
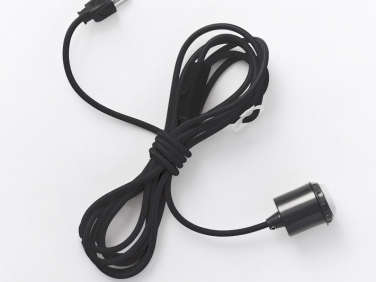
- Pendant cord set, such as the Nylon Cord Set in white from West Elm, $29, or Ikea’s Hemma Cord Set, $5
- Clear Globe Light; $6.99 from Amazon or your local hardware store
- Needle-nose pliers
- Phillips head screwdriver
- 3mm Hex L Key (needed for use with the West Elm cord set, but not necessarily all cord sets)
- Wall bracket (optional)
- Baking soda, water, and paintbrush (optional)
Instructions

Step 1: To make the light, begin by dismantling the cord from the bulb socket. This is a fairly simple process, but directions may vary slightly depending on the pendant cord you choose. Using the West Elm Nylon Cord Set, I first unscrewed the bolt holding the cord to the socket casing with the hex key. (If you go with Ikea’s Hemma Cord Set, read the dismantling instructions from Instructables.)

Step 2: Using a Phillips head screwdriver, unscrew the light socket from the metal housing. Then unscrew the wires, remembering the placement of each for later, when you reattach the parts.

Step 3: In the cord kit that I worked with, I found three electrical wires (green, white, and black). The white and black wires were connected to the socket itself and could be easily unscrewed. The green wire was screwed into a fitting inside of the metal housing, so I used a pair of needle-nose pliers to remove it. Cords and sockets can be wired a number of ways, so consider looking up tutorials online for specific instructions on how to dismantle yours.

Step 4: Once you’ve disconnected the cord from the metal housing, you can string the flowerpot through the cord (the standard hole in the bottom of pots is perfect for this). Then retrace your steps to reassemble the cord to the socket.

Step 5: You can either hardwire the pendant cord according to the manufacturer’s instruction, or, using a shelf bracket, wrap the cord around the bracket to hang the light.

Above: The finished results. I opted to leave the terracotta untreated, but for a rougher look, you can add a patina to the pot by brushing on a solution of baking soda and water. (Note that this creates an indoor-only finish–it washes off when wet.)
See some of our favorite handmade terracotta pendants in Terracotta Pendant Lights by Thomas Housden. For more do-it-yourself lighting projects, visit DIY: A New $60 Lindsey Adelman Pendant Light, DIY: An Industrial Wall Light for $15, and DIY: The $7 Pendant Light Redo.


Have a Question or Comment About This Post?
Join the conversation