Several months ago, my close friends Serena Cameirano and Ron Keizer bought their first place together, a two-story 1930s row house in San Francisco. The structure is in great shape–I’m more than a little jealous–but a few rooms and the entire basement floor leave something to be desired. Since the purchase alone stretched their budgets, the pair resolved to do all home improvement work themselves. They even thought it would be fun.
Not knowing where to start, they first took aim at the basement, a dingy dungeon with red vinyl-upholstered walls reminiscent of a padded cell. But two weeks later, having direly misjudged the time it would take, they quit to welcome houseguests and resolved to pick up the project after their company left. That room is still a mess, but between then and now, the basement bathroom became the most polished room in the house. How? Together we learned there’s nothing like a deadline to make amazing things happen quickly.
Photography by Meredith Swinehart.
After

Above: Knowing that Remodelista’s DIY Bath Week was impending, I suggested to my friends that we redo their bathroom together as a firsthand story. Feeling this just might be the impetus they needed, they gamely said yes. They now have a shiny new bathroom.

Above: How did we do it on such a short timeline? My friends had a contractor in mind–a friend of a friend (more on that later)–and he was available to start right away. We shopped for tile on day one, looking only at options that were already in stock. For the shower surround, we chose basic white subway tile–to me, the best choice if you’re on a budget. We used Daltile Rittenhouse Square Three-by-Six Modular Wall Tile in white; $22 for 12.5 square feet at Home Depot. (In addition to being affordable, it’s made in the US.)

Above: For the floor, we selected 12-by-24-inch natural slate tile from Ceramic Tile Design in SF for $5.10 a square foot. It wasn’t in stock, but could be shipped from another store free of charge within five days. We knew the contractor could start on the shower in the meantime, so that was good enough.

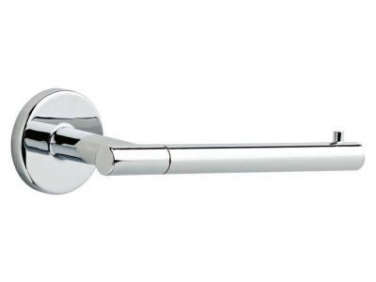
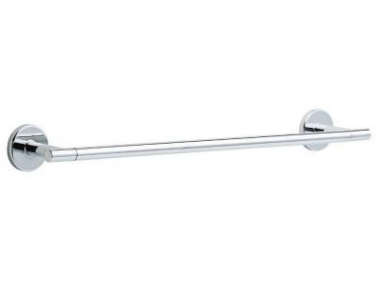
Above: My friends’ sink was in fine shape, so we left it and the faucet alone. We had the contractor remove two rusted, wall-mounted soap dishes, a toilet paper holder, and a towel bar, and we replaced those with basics from Home Depot: a Lyndall 18-Inch Towel Bar for $24.98 and a Lyndall Single-Post Toilet Paper Holder for $19.98, both in polished chrome from Delta. For the trash bin, we used a Curved Storage Basket made of eco-friendly water hyacinth; $29 for the small basket at West Elm.

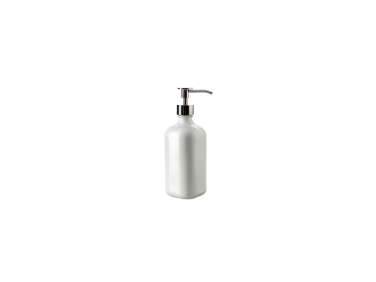
Above: We struggled with the mirror. As was, the bathroom sported an aging mirror with partly rusted hardware over a custom-made medicine cabinet. We tried and failed to find a mirror that would cover the dimensions of the recess, intending to hang it with hinges so it would function as a working cabinet. In the end, we purchased a cheap mirror from Home Depot and tucked it into an Ikea Ribba Frame in medium brown; $19.99 for a 19-by-27-inch frame. We hung it over the cabinet like a piece of art, so the recessed cabinet is no longer in use. We placed a Bestí¥ende Detergent Dispenser on the sink as a soap pump; $8.99 at Ikea.

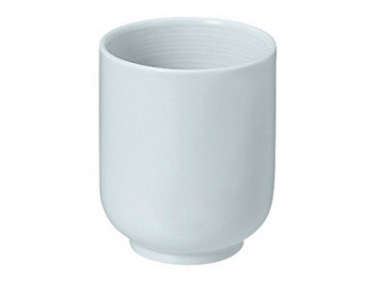
Above: Serena put in a special request for a few succulents perched in the well of a pass-through window (which for some odd reason opens into the garage). We found three small plants at Home Depot for $2 each and repotted them in two White Porcelain Sencha Teacups ($4.75 each) and a White Porcelain Yunomi Teacup ($4.75), both from Muji and made in Japan.

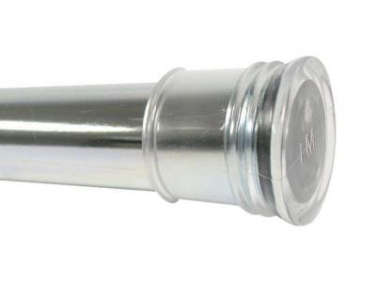
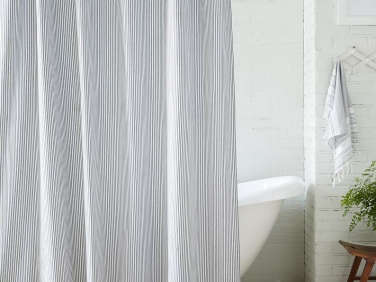
Above: A new Ticking Stripe Shower Curtain ($59 from West Elm) now hangs from a 72-inch Tension Rod in chrome; $16.99 from Home Depot. We used Bringen Shower Rings from Ikea; not listed on their website, but $5.99 for a set of 12 in store.

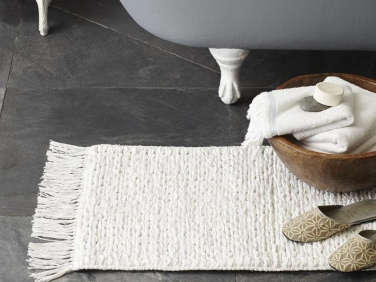
Above: The last of the accessories: an Acacia Square Plate; $6.50 from Muji, and a Mixed Weave Bath Mat–100 percent cotton and made in India–for $29 from West Elm.
Before

Above: The existing bathroom was surrounded in 1970s-era, blue faux tile. Yes, you read that right: faux tile. The walls were covered in huge bands of plastic–the three of us had never seen this before, and we hope to never see it again.

Above: The showerhead and bathtub faucets were old and leaky, so my friends asked the contractor to remove them prior to installing the new tile. He took off the surface fixtures but didn’t remove any of the actual plumbing, so this is one fix that didn’t make the deadline. The contractor is now figuring out how to install new shower fixtures around his new tile. (We’re guessing he can’t, and that some of the beautiful new shower tile will need to be destroyed. Fingers crossed that this is not the case.)

Above: The floor was covered in dotted green linoleum. Beneath that was dark red, 1940s-era ceramic tile.
The Budget
Serena and Ron wanted to keep the cost of their bathroom remodel under $2,000. That didn’t happen. See the next section for lessons learned about labor costs; here’s the breakdown of their actual expenses.
Slate tile, 70 square feet at $5.19 per square foot: $396
White subway tile, 90 square feet at $1.76 per square foot: $173
Installation materials purchased by contractor (shower sealant, grout, tools): $700
Installation materials purchased by homeowner (paint, slate tile sealant): $52
Labor for two contractors at $40 per hour (removal of existing faux tile and flooring, installation of shower and floor tile, painting of walls and ceiling): $2,700
Decor (shower curtain, wastebasket, bath mat, lighting, outlets, towel bar, toilet paper holder, mirror, frame, accessories): $311
Total = $4,332
Lessons Learned
- Be mindful of labor costs. Serena and Ron hired one contractor–the aforementioned friend of a friend–at $40 an hour to do an estimated two to three days of work. Two people showed up, each at $40 an hour, and took five days to finish the job. Had they to do it over again, my friends would have gotten competitive bids from tile setters and held them to it.
- Be clear with your contractor about at what point the work is finished. After the crew was “done” tiling, we spent a lot of energy cleaning up–scrubbing excess grout off the shower walls and painting over accidental swipes of black grout on white walls.
- If something can go wrong, trust that it will–and everything takes longer than you think it will. We did quite a bit of the work ourselves–everything but removing the existing finishes, installing the new tile, and painting the room a fresh coat of white–and it was, well, quite a bit of work. My partner in crime, Serena, had never done anything like this before, and I am notorious for misjudging how much time a project will take. For example: Swapping out an existing light fixture sounds like it might be a 10-minute project. But while removing the fixture, the head of an ancient screw popped off, and we had to pry out the screw with pliers. The arcane electrical wire was about as easy to bend as a rock–it took us 45 minutes to wrap it around the new fixture without snapping off when we shoved the wires back in. And we did this in the dark because we had to turn off the power in the bathroom, but we misjudged the source of electricity for one of the outlets. (Next time: Invest in a Voltage Tester). Thankfully, both of my friends live to tell the tale–and plan to take a lot of relaxing baths to recover from their first remodel.
For more bath renovation chronicles, see Reader Rehab: A Budget Bath Remodel with Little Luxuries, Rehab Diaries: A Spare Bedroom Turned Glam Master Bath, and the Remodelista Considered Design Awards 2014 Best Amateur-Designed Bath Space.
Frequently asked questions
What is the cost of the bath remodel?
The total cost of the bath remodel was less than $5,000.
How long did the bath remodel take?
The bath remodel took two weeks to complete.
What were some of the main changes made to the bathroom?
The main changes made to the bathroom were replacing the toilet, sink, and shower fixtures, painting the walls and cabinets, and installing a new light fixture and medicine cabinet.
Was any professional help hired for the remodel?
No, the homeowners completed the remodel themselves.
Were any permits needed for the remodel?
No, permits were not needed for the changes made to the bathroom.
What tips do the homeowners have for a budget bathroom remodel?
Some tips from the homeowners include repurposing materials, shopping for deals, and doing the work yourself if possible.


Have a Question or Comment About This Post?
Join the conversation