This week we’re revisiting some of the most popular DIY stories from our archives. Read on for end-of-summer project inspiration:
By day, Maiju Saha works as a social media marketing specialist and campaign designer. By night and on weekends, the mother of three dives into home improvement projects and blogs about them.
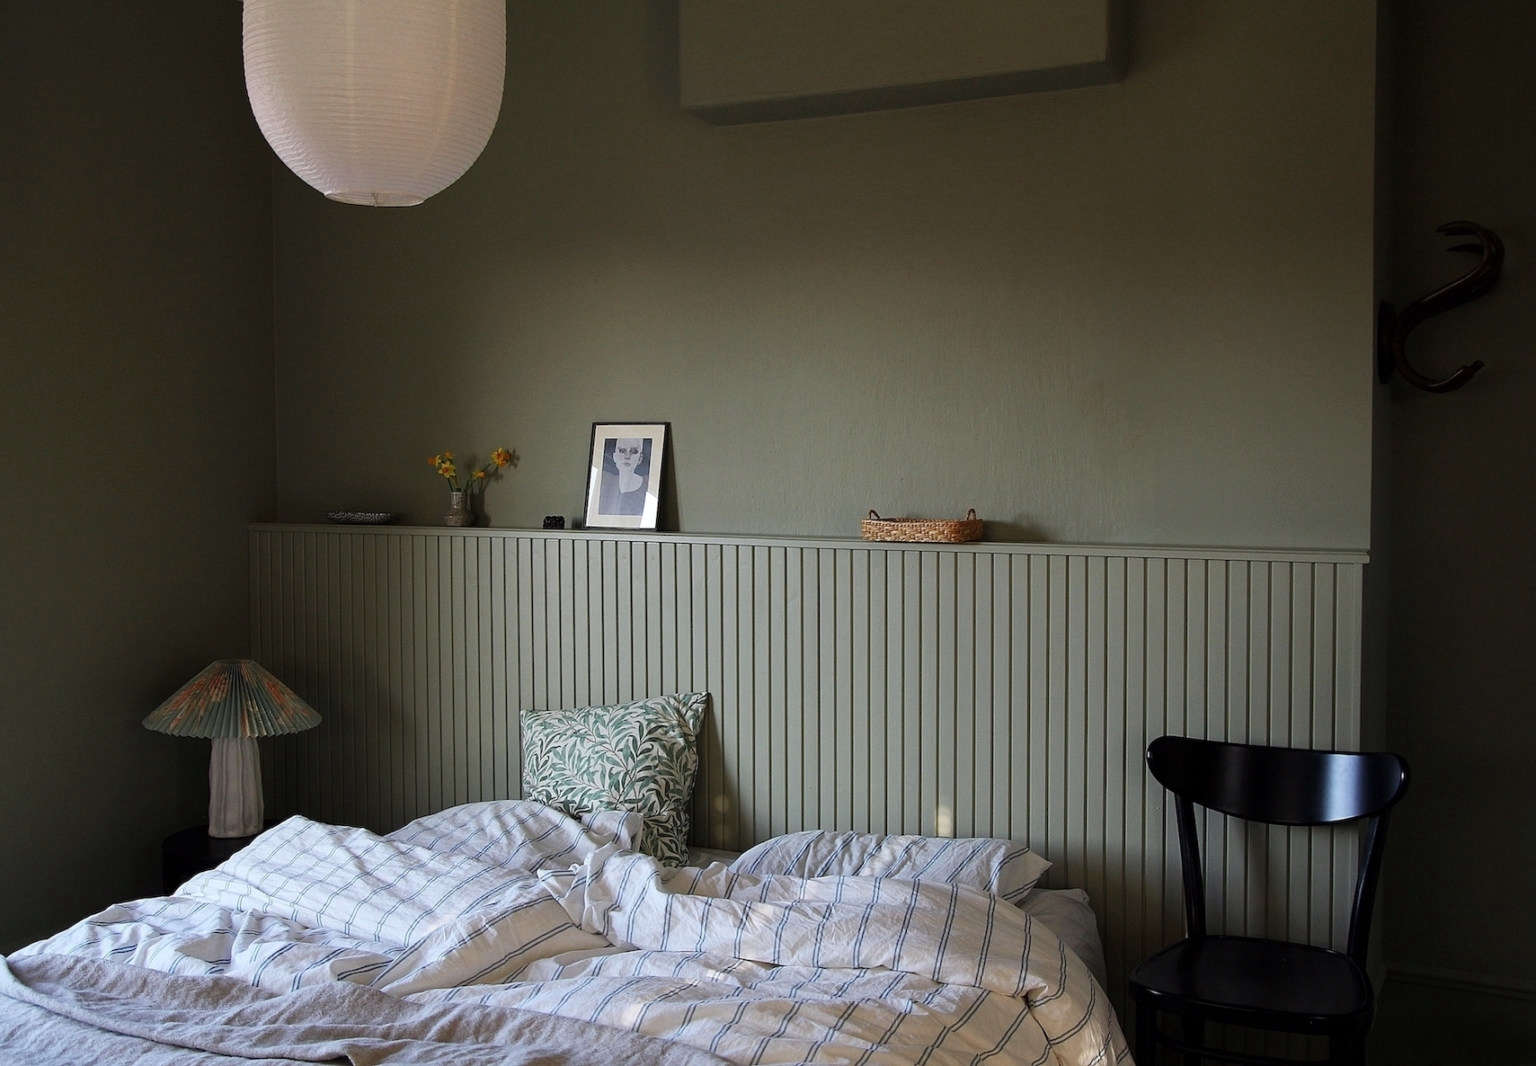
Maiju and her family live in the small town of Vaasa on Finland’s west coast. Two years ago they moved into their 1941 house and since then she’s be puzzling over how to make her and her husband Janne’s compact bedroom feel “less empty without crowding it with furniture.” Taking inspiration from the room’s paneled ceiling—and all the paneling she’s been admiring in other people’s quarters of late—Maiju came up with this DIY built-in headboard of homemade beadboard. She kindly agreed to share the project with us.
Photography by Maiju Saha (@maiju_saw), courtesy of the Maiju Saw blog.
The Materials
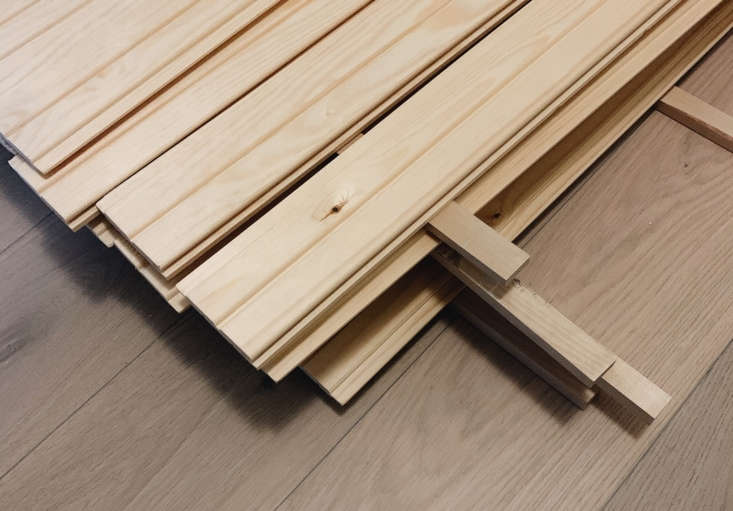
- slotted wood panels cut to the right height (Maiju’s are approximately 45 inches tall)
- wood for the frame (“this will be covered so it can be any kind of wood, even rough” says Maiju)
- thin nails for attaching the panels
- screws for affixing the frame
- good-quality wood to use as a shelf at the top of the headboard
- wood filler
The Tools
- crosscut saw
- hammer
- power drill
- paint
- paint brush
Instructions


Maiju says she’s self taught and that one project has led to another: “It’s been a long process starting with painting picture frames and chairs. Over time, I’ve learned to use different electrical tools. Renovation projects are my meditation. And since my other work is digital, it’s always so rewarding to see concrete results.” Interestingly, Maiju’s last name, Saha, translates as “Saw” in English, which is how she got her blog name, Maiju Saw.

The Finished Project


Browse our DIY Project archives for more ideas, including:
- Rehab Diaries: DIY Beadboard Ceilings, Before and After
- A DIY Kitchen Overhaul for Under $500, Beadboard Backsplash Included
- Idea to Steal: A DIY Headboard from a Natural Fiber Rug
N.B.: This story is an update; it originally ran on December 16, 2020.
Frequently asked questions
What is a DIY paneled wood headboard?
A DIY paneled wood headboard is a headboard made using wooden panels that are assembled together to create a decorative and functional piece for a bed.
Why should I consider a DIY wood headboard for my small bedroom?
A DIY wood headboard can be a great solution for a small bedroom as it adds a focal point to the room without taking up too much space. It also allows you to customize the design to match your bedroom's style.
What materials do I need to make a DIY paneled wood headboard?
To make a DIY paneled wood headboard, you will need wooden panels, a saw, a drill, screws, sandpaper, a measuring tape, and a level. You may also need stain or paint if you want to add color to the headboard.
Do I need advanced woodworking skills to make a DIY paneled wood headboard?
No, you don't necessarily need advanced woodworking skills to make a DIY paneled wood headboard. Basic carpentry skills and some experience with power tools should be sufficient. You can find detailed step-by-step instructions in the article linked above.
Can I customize the design of my DIY paneled wood headboard?
Yes, one of the advantages of making your own DIY paneled wood headboard is the ability to customize its design. You can choose the type and color of wood, the size and shape of the panels, and even add additional decorative elements if desired.
How long does it take to make a DIY paneled wood headboard?
The time required to make a DIY paneled wood headboard can vary depending on your skill level, the complexity of the design, and the tools you have. On average, it can take a few hours to a full day to complete the project.
Is it cost-effective to make a DIY paneled wood headboard?
Making a DIY paneled wood headboard can be cost-effective compared to buying a pre-made headboard. The cost will depend on the materials you choose, but it generally allows you to save money while still achieving a high-quality and customized piece.
Are there any safety precautions to keep in mind when making a DIY paneled wood headboard?
Yes, when working with power tools, it is important to follow safety guidelines and wear protective gear such as safety goggles and gloves. Additionally, be cautious when handling sharp tools and make sure to secure the headboard firmly to the wall to prevent accidents.

Have a Question or Comment About This Post?
Join the conversation