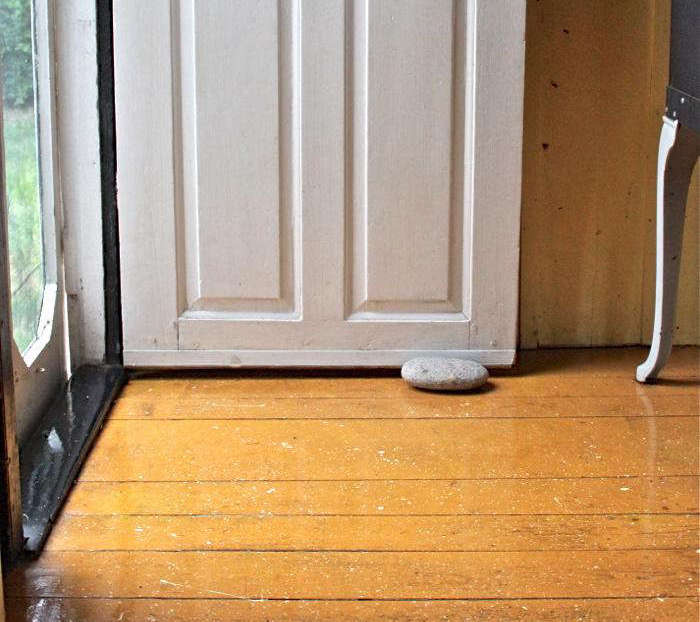
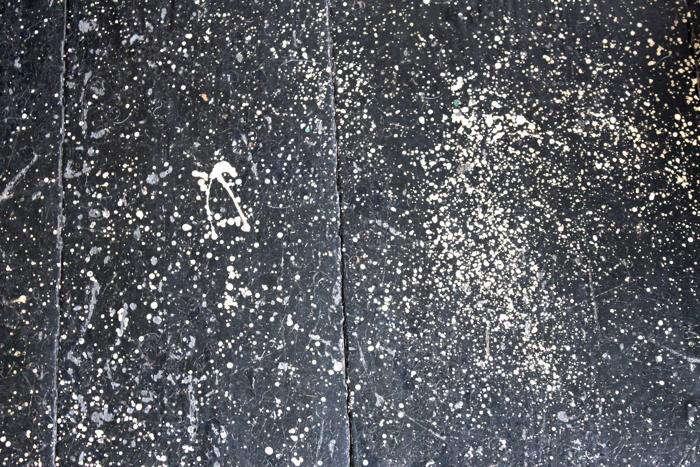
Icon - Arrow LeftAn icon we use to indicate a rightwards action. Icon - Arrow RightAn icon we use to indicate a leftwards action. Icon - External LinkAn icon we use to indicate a button link is external. Icon - MessageThe icon we use to represent an email action. Icon - Down ChevronUsed to indicate a dropdown. Icon - CloseUsed to indicate a close action. Icon - Dropdown ArrowUsed to indicate a dropdown. Icon - Location PinUsed to showcase a location on a map. Icon - Zoom OutUsed to indicate a zoom out action on a map. Icon - Zoom InUsed to indicate a zoom in action on a map. Icon - SearchUsed to indicate a search action. Icon - EmailUsed to indicate an emai action. Icon - FacebookFacebooks brand mark for use in social sharing icons. flipboard Icon - InstagramInstagrams brand mark for use in social sharing icons. Icon - PinterestPinterests brand mark for use in social sharing icons. Icon - TwitterTwitters brand mark for use in social sharing icons. Icon - Check MarkA check mark for checkbox buttons.
You are reading

DIY: New England Spatter-Painted Floors

Search

DIY: New England Spatter-Painted Floors

August 15, 2018

Here on Cape Cod (where I’m lucky enough to spend the summer), splatter- or spatter-painted floors are so common that we take them for granted. I don’t know why our Victorian area ancestors started spatter-painting their floors—perhaps they couldn’t afford rugs, or more likely, they didn’t want to constantly beat the sand out of them—but I, for one, am glad they did. First of all, spatter-painted floors hide a multitude of sins; almost nothing shows up on them. But more important, they are simply beautiful. They’re a wonderful way to add texture and interest while still keeping the overall look minimal and clean.

Creating your own spatter-painted floor is easier than it looks; all that’s required is paint (here’s a chance to use leftover cans sitting in the garage) and a couple of long bristle brushes or plastic forks—anything you can flick, even a handheld broom will do. Gloves are also recommended. Luckily, the important thing is not perfection. For best results, you want random globs and clusters in myriad sizes, not a uniform spread. But be careful not to overdo it. Think small galaxies in the night sky, not Jackson Pollock.

N.B.: To see more, go to The Soulful Side of Old Cape Cod: Justine’s Family Cottage.

first apply the base undercoat (usually in a darker color than the spatters). a 17
Above: First apply the base undercoat (usually in a darker color than the spatters). Allow floor to thoroughly dry for a few days. Then the fun begins. Dip the prongs of your fork or the end of your brush in the paint. Then, from a standing position, gently tap the handle of the fork or brush with another brush of paint stick as you move across the floor. This technique gives you a bit more control and allows you to spread the drips more evenly. Use just a drop of paint to create smaller dots; more for larger ones. Photograph by Matthew Williams from the Remodelista book.
for character, you’ll also need a few dribbles. for these, coat the 18
Above: For character, you’ll also need a few dribbles. For these, coat the fork or brush with a bit more paint and turn it sideways so the paint drips off in the end. Then flick your wrist or move it in a curve.
allow your spatters two days to dry before moving furniture onto them. 19
Above: Allow your spatters two days to dry before moving furniture onto them.
a guest bedroom floor painted green with white spatters. 20
Above: A guest bedroom floor painted green with white spatters.
my kitchen floor is an unexpected shade of pumpkin spatter painted with white a 21
Above: My kitchen floor is an unexpected shade of pumpkin spatter-painted with white and black.

N.B.: This story is an update; the original story ran on November 12, 2015.

For more New England quirk, see our posts:

(Visited 3,889 times, 1 visits today)
You need to login or register to view and manage your bookmarks.

Have a Question or Comment About This Post?

Join the conversation

v5.0