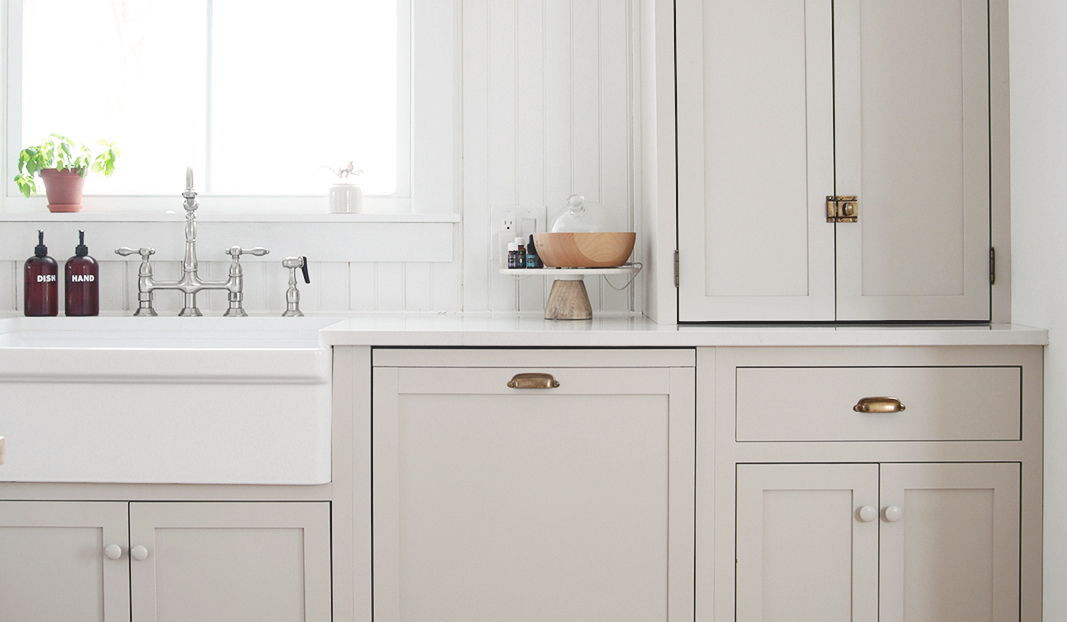
Disguising appliances behind cabinet panels is a unifying trick, one that we often feature in our Kitchen of the Week. But integrated appliances are pricier than their traditional counterparts and they don’t always come in the desired sizes. We were happy to see that the creative thinkers behind the website The Merrythought have come up with a DIY way for handy sorts to camouflage standard dishwashers and fridges.
Photography courtesy of The Merrythought.

Over the course of 16 months, The Merrythought co-founder Manda McGrath and her husband, Mike, entirely rebuilt their kitchen themselves giving it a modern farmhouse look.


Feeling inspired? Peruse our DIY Projects archive for more ideas, including these favorites from The Merrythought:
- DIY Display-Worthy Racks: 3 Minimalist Designs for Drying Herbs, Dishes, and Laundry
- DIY Wooden Dowel Hanging Planter
- DIY Peg Rail, Cube Side Table, and Other Wooden Storage Solutions
Frequently asked questions
What is the purpose of adding panels to a dishwasher and refrigerator?
The purpose of adding panels to a dishwasher and refrigerator is to seamlessly integrate them into the surrounding cabinetry, creating a cohesive and unified look in your kitchen.
Can I add panels to any dishwasher and refrigerator?
Most dishwashers and refrigerators are designed to accommodate panels, but it is recommended to check the user manual or contact the manufacturer to ensure compatibility before starting the project.
What materials do I need to add panels?
To add panels to a dishwasher and refrigerator, you will need plywood or MDF panels, appropriate panel adhesive, screws, sandpaper, paint or stain (if desired), and basic carpentry tools.
Do I need any carpentry skills to add panels?
Some basic carpentry skills are recommended to ensure proper measurement, cutting, and installation of panels. However, with careful planning and following detailed instructions, even DIY beginners can successfully complete this project.
How do I measure the dimensions for the panels?
To measure the dimensions for the panels, use a tape measure to determine the height and width of the dishwasher and refrigerator doors. Add a 1/8-inch gap on all sides for clearance and ease of installation.
Can I customize the panels to match my kitchen decor?
Yes, you can customize the panels to match your kitchen decor. Sand the panels to smooth any rough edges, then paint or stain them in the desired color or finish before attaching them to the dishwasher and refrigerator doors.
How do I attach the panels to the dishwasher and refrigerator doors?
Apply panel adhesive evenly to the back of the panels, then carefully position and press them onto the doors. Secure the panels with screws through pre-drilled holes in the doors. Follow specific instructions provided by the manufacturer for the best results.
Can I remove the panels later if needed?
Yes, you can remove the panels later if needed. Simply unscrew them from the dishwasher and refrigerator doors, and carefully detach them using a putty knife or heat gun to soften the adhesive.
Is adding panels to a dishwasher and refrigerator a reversible process?
Adding panels to a dishwasher and refrigerator is reversible, as long as the doors remain undamaged. Once the panels are removed, the appliances will revert to their original appearance.
Are there any precautions or tips to keep in mind while adding panels?
Some precautions and tips to keep in mind include ensuring the panels do not obstruct any vents or access to controls, using appropriate panel adhesive to ensure a strong bond, and avoiding excessive force when attaching or removing the panels to prevent damage to the appliances.


Have a Question or Comment About This Post?
Join the conversation