I recently fell for a set of braided wool napkin rings from German company Uccellino, and was about to buy them when I remembered a bunch of leftover wool roving from my weaving days. Finding where I had stashed the wool was the hard part, and with it, I made a similar set of napkin rings for a fraction of the price. Here are the details.
Would rather purchase Uccellino’s set? The 5 Cream Crocheted Napkin Rings are £43 at CoutureLab and 4 Pink Napkin Rings are £29.50 from Uccellino.
Photography by Alexa Hotz.

Materials
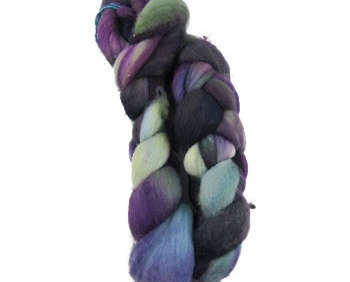
- 2-4 ounces of wool roving, such as Malabrigo’s Nube Hand-Dyed Roving made from 100 percent pure merino wool, shown in natural, $15.25 from Imagiknit
- A pair of scissors
- A few napkins to ensure a good fit
- A heavy object to serve as a weight

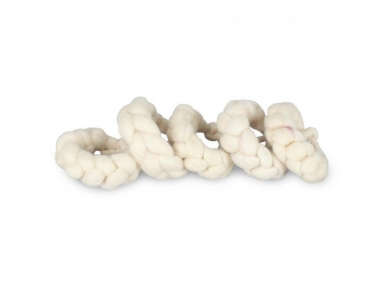
Above: First, split about 10 inches of wool into three equal sections, and weight it down on one end with a rock or heavy object. Then tightly braid the wool.

Above: Snip off the braided piece, leaving about one to two inches of slack on either end.

Above: Dip the ends in hot water and agitate them just a bit–this is similar to the felting process. Tie the two ends together in a tight knot and rework them back into the braid, hiding the ends beneath the rest of the wool.

Above: Keep in mind that the wool can expand some to fit various napkin sizes, but a ring that is about eight inches in circumference should work nicely for most.

Above: A set of six napkin rings costs nothing more than the price of wool roving–about $15.
Looking for more easy projects? Explore our collection of DIY & Remodeling posts, including How Do You Make An Extension Cord Beautiful?


Have a Question or Comment About This Post?
Join the conversation