When we moved into our historical New England home, my four-year-old daughter, Solvi, selected a small corner room as her own. To her, it felt like the coziest space in the big old house. To me, with its dark burgundy walls and stark white trim, it felt oppressive and cold. Something had to be done–and quick.
My first inspiration was to warm up the room with wallpaper, a pretty yet sophisticated floral from Farrow & Ball. Alas, this proved a bit (OK, way) outside my budget, even if I installed the paper myself. Then I found what seemed like an ingenious solution: a paint roller that mimics the effect of wallpaper. I browsed all the inspiring ideas from The Painted House and watched the “how to” video. It seemed simple enough, certainly easier than applying wallpaper, so I ordered one up.
I’m not going to lie, it was NOT easy. The learning curve was steep. And after several major misapplications of the stencil and re-applications of my base coat, I was ready to downsize my ambitions from a stenciled room to just one accent wall–or to throw in the towel altogether. But through sheer determination, I persevered (I was not to be defeated by one little roller). The results are well worth it. Now that I’ve identified the potential pitfalls, I can guide you on how to get this look yourself. Mind you, it’s not exactly easy, but perhaps it doesn’t have to be quite so hard.
Photos by Justine Hand, except where noted.

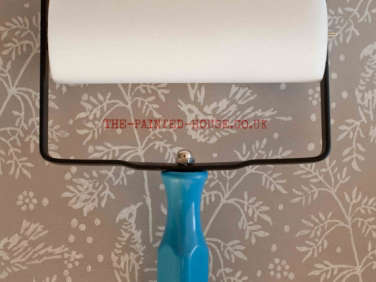
Above: Clare Bosanquet, owner of The Painted House, found the original rollers in a market in Romania, where people have been using them as economical alternatives to wallpaper for the last century or so. For our project, Solvi and I chose The Painted House’s whimsical bird pattern, which we felt was perfect for our historic home. The roller is £15 (don’t forget to order the applicator as well; £10). Photo via The Painted House.
THE INSPIRATION

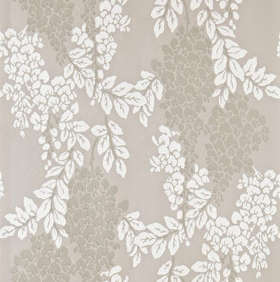
Above: I was inspired by Farrow & Ball’s Wisteria Wallpaper (yes, one of the patterns Michelle chose for her bathroom), which costs $295 per roll. Photo via Farrow & Ball.
THE MATERIALS
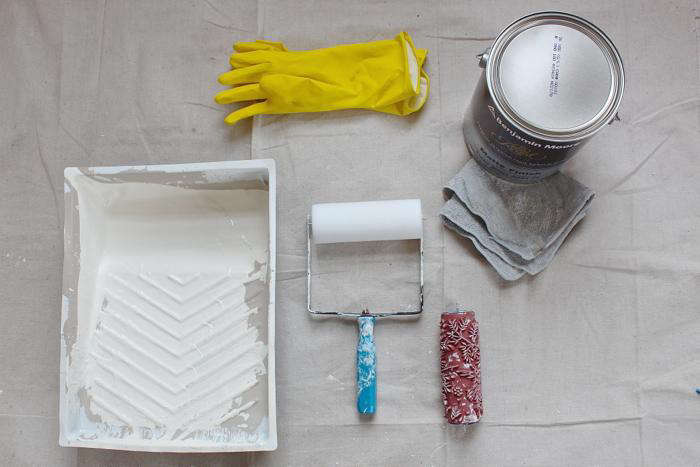
Above: The supplies include everything you would normally need to paint a room. The only additional items for this project are the patterned roller and the applicator from The Painted House. And don’t forget those gloves, they are your new best friend.
STEP BY STEP

Above: The first step is to apply the base coat. For the walls, I chose Benjamin Moore’s Old Soul (CSP-65) in matte from the new Color Stories line, which looks almost beige on the swatch but is really a rich, warm gray. For the trim, I selected BM Linen White in an eggshell finish. For both, I used Benjamin Moore’s Aura paint, which is expensive (although not wallpaper expensive) but offers excellent control and coverage. One coat nearly covered all the dark walls.

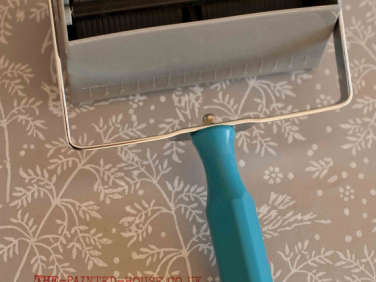
So far so good. Now comes the tricky part. Clare provides links to helpful step-by-step videos here, which I will augment with tips from my experiences. First assemble the roller and applicator. You want to make sure that both the pattern and the paint roller are secure but turn easily. And here is potential pitfall No. 1. In my set, the prongs on the paint roller were ever so slightly shorter than those on the roller, so my pattern roller would get stuck and start sliding (as opposed to rolling) down the wall. Or my paint roller would fall away from the pattern roller. I used pliers to bend the center of the applicator arms in, and the ends that hold the pattern out. This was a breakthrough. From then on, the project went from exasperating to manageable.

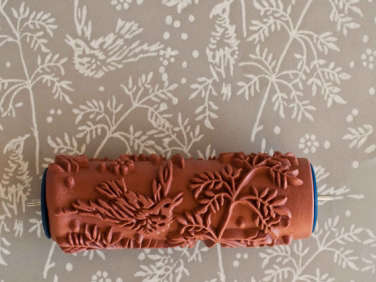
Above: You need to saturate your paint roller well; I used a matching Linen White in matte for my bird pattern (it is very important that you use a matte finish for both the base and cover coat, or your roller will slip).
First you remove the patterned roller. Put a bit of your paint into a pan and begin to apply it to the roller, grabbing a small amount and rolling it into the high-density foam paint roller until the pigment seeps a fare way in–at least halfway to the center. Then grab your gloves. Taking your paint roller, insert it into the middle hole on the bottom set. Then insert the pattern in the top slots. Turn the patterned roller to cover it in paint and roll a few times on a piece of paper to remove the excess pigment. Note: On my 9-foot-high walls, I found that I had to get more paint on my roller after two rows, otherwise the application would become uneven.
My first piece of advice on this step is practice, practice, practice. My problem was that I practiced on some existing wallpaper that I was planning on stripping. The hiccup in this plan was that it is much easier to apply the pattern to the more porous paper, so that when I got to the walls my technique fell apart and the roller started slipping and smudging the paint.
In fact, here’s what I recommend. Even before you apply the base coat, practice on the existing walls. That way you won’t have to repaint your base over egregious mistakes (like I did).
Clare has marked the sides of her rollers with handy plus and minus signs so you can keep track of your pattern. For an alternating wallpaper pattern, you start each row on an alternating sign: plus, minus, plus, minus. Place your roller with the plus or minus aligned with the top of your wall (you want to be looking at an upside-down bird on your roller, in order to get a right-side-up one on your wall). Keeping your roller at a slight angle to the wall, pull down. (Ideally you want to remove all trim to get a clean edge, but my trim was impossible to remove without a contractor.)

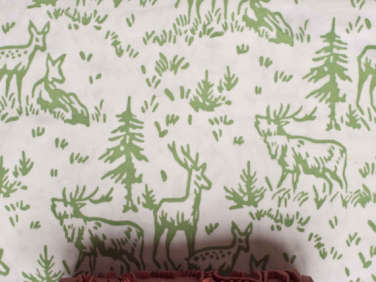
Above: An example of the alternating pattern on my walls. The painted wall even has the same nice raised texture as expensive papers.
For the next row start again, now with the opposite plus or minus sign aligned with top. Clare recommends overlapping the patterns slightly, and I would like to emphasize this point. In fact, if you have to err one way, it’s better to overlap the pattern more, otherwise, you get stripes in between each row. Repeat until the wall is mostly covered, leaving any edges which are not large enough to accommodate the entire roller. These gaps you can paint at the end by covering your existing pattern with paper and tape.
One final word of advice: embrace imperfection. This project is best suited for rooms with lower ceilings and less trim. With my high ceilings (9 feet), applying the paint was tricky because I had to start at the top of the ladder and walk down it while maintaining a straight line. (It was pretty funny watching me scoot down the rungs to end in a grande plie at the bottom.) Inevitably, there are some wonky spots on my walls. But this is about overall effect. Besides, the few mistakes are very much in keeping with the old house feel.

Above: The finished product: Solvi’s room is light and airy.
Now I’m excited about my newfound skill and am looking forward to all sorts of DIY projects involving furniture, paper and even fabric (perhaps with one of Clare’s new patterns due out this spring). And that’s a good thing, because now my son Oliver wants a deer pattern in his room.

Above: Solvi’s antique day bed also got a makeover in glossy Linen White. (For more photos of the completed room visit designskool.)

Above: Now one final question: to paint the floor or not? Ideally, I’d love to do something like Izabella’s whitewashed Scandi floors, but until then, I’m not sure whether to paint them or leave them as is. And if paint, what color? Linen White or gray? What do you think?
Now that I have mastered the art of stencil rollers as wallpaper, maybe I’ll try my hand at other creative stenciling.


Have a Question or Comment About This Post?
Join the conversation